CMI Lite
CMI (Control Module Interface)
Lite is a hand-held service tool for EFI-equipped Buell™ motorcycles. This tool
allows the user to read ECM historic trouble codes, clear historic codes, check
the idle position, and reset the Throttle Position Sensor. The tool uses the
standard diagnostic port to communicate with the ECM.


![]()
![]()
![]()


![]()
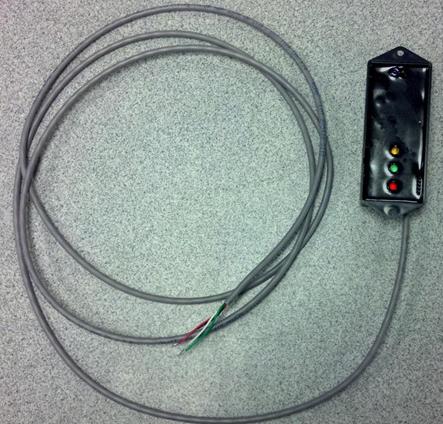
(Note: The prototype unit is pictured. Production
unit will have a 4-pin Deutsch connector, no infrared LED pair, and probably no
programming header.)
Table
1: The Status LEDs indicate power, communication, and calibration status.
|
LED |
On |
Flashing |
|
Red |
Searching for ECM connection |
Communicating with ECM |
|
Yellow |
Error or engine rotation |
Status of requested function |
|
Green |
Completed requested function |
Status of requested function |
Table
2: Interface cable
|
4-way Deutsch pin |
Wire color |
Usage |
|
1 |
White |
Serial TXD (Transmit Data) |
|
2 |
Black |
Ground |
|
3 |
Green |
Serial RXD (Receive Data) |
|
4 |
Red |
12 VDC power (10 mA avg) |
Directions for use
with DDFI, DDFI-2B, DDFI-2C
Table 3: Diagnostic connector
location, motorcycles with DDFI, DDFI-2B, DDFI-2C
|
Motorcycle |
Model Year |
Diagnostic connector location |
|
Buell™ X1 |
1999-2002 |
Right of the steering head
tube |
|
Buell™ S3 and S3T |
1999-2002 |
Under the seat |
|
Buell™ XB9R and XB12R |
2003-2007 |
Left stalk of the fairing
support bracket |
|
Buell™ XB9S, XB9SL, XB9Sx, XB12S, XB12Scg, and XB12SS |
2003-2007 |
Under the seat |
|
Buell™ XB12X |
2006-2007 |
Left side of the tail
section near rider’s leg |
Plug the tool into the 4-pin
diagnostic connector on the motorcycle.
1. Reading historic trouble codes
The tool causes the ECM to
“flash out” trouble codes on the Check Engine Lamp on the instrument cluster.
- Begin with the ignition key OFF, run/stop switch
in RUN position, and throttle CLOSED.
- Turn the ignition key ON. All three LEDs will
blink once, and then the red LED will blink continuously. The green and
yellow LEDs will indicate the idle setscrew position (see next page).
- After at least one second, fully open and hold
the throttle for one second. The green LED will blink once. The red LED
will continue blinking.
- Release the throttle and allow it to fully close.
The yellow LED will blink once. The red LED will continue blinking.
- Turn the ignition key OFF. All LEDs will turn
off.
- Turn the ignition key ON. All three LEDs blink
once, then the green and red LEDs turn on and stay on.
- Read the trouble codes by watching the Check
Engine Lamp on the instrument cluster. For a description of how to read
the “flash out” sequence and a list of codes see Appendix A.
- When done reading codes, turn the ignition key
OFF. All LEDs will turn off.
2. Clearing historic trouble codes and resetting the
Learned Fuel (Adaptive Fuel) Value
The tool can clear historic
trouble codes on all EFI-equipped Buell™ motorcycles. It can also set the
Learned Fuel Value to factory default (i.e. 100%).
NOTE 1: If your vehicle is located at high altitudes (e.g.
4000’ or more), resetting the Learned Fuel Value to factory default will cause
the engine to operate with a rich air/fuel mixture until the ECM self-corrects.
NOTE 2: The historic trouble codes will be cleared
prior to resetting the Learned Fuel Value. Please make note of any historic
trouble codes prior to resetting the Learned Fuel Value.
- Begin with the ignition key OFF, run/stop switch
in RUN position, and throttle held OPEN.
- Turn the ignition key ON. All three LEDs will
blink once, and then the red LED will blink continuously.
- Continue to hold the throttle fully OPEN. The
yellow LED will blink 4 times, then the green LED will turn on and stay on
for one second (see *NOTE below). This indicates that the codes have been
cleared. If you DO NOT want to reset the Learned Fuel Value to factory
default, CLOSE the throttle at this point and go to step “e.”
- If you want to reset the Learned Fuel Value to
factory default, continue to hold the throttle fully OPEN. The yellow LED
will again blink 4 times, then the green LED and the red LED will turn on
and stay on (see *NOTE below). This indicates that the Learned Fuel Value
has been set to factory default.
- Turn the ignition key OFF. All LEDs will turn
off.
*NOTE: If the yellow LED
turns on and stays on in steps “c” or “d”, turn the ignition key OFF and retry
the procedure. This can happen if:
-
The engine is
cranked or started
-
Communication
problems prevent the trouble codes from being cleared or the Learned Fuel Value
from being reset to factory default.
Directions for use
with DDFI, DDFI-2B, DDFI-2C, continued
3. Checking and adjusting the Idle Setscrew Position
Buell™ motorcycles built
prior to model year 2008 have an idle setscrew. This setscrew allows the rider
to adjust the engine idle speed. The tool indicates if the idle setscrew is
adjusted within normal tolerances.
- Begin with the ignition key OFF, run/stop switch
in RUN position, and throttle CLOSED.
- Turn the ignition key ON. All three LEDs will
blink once, then the red LED will blink continuously. The green and yellow
LEDs will indicate the idle setscrew position (see Table 1 below).
- Adjust the idle setscrew until the Green LED
turns on continuously. If the yellow LED is flashing, turn the setscrew IN
(opening the throttle plate). If the green LED is flashing, turn the
setscrew OUT (closing the throttle plate).
Note: This procedure sets the idle
setscrew to factory default setting for typical, near-sea-level locations. Your
vehicle may require a higher or lower setpoint depending on engine condition,
altitude, and other factors. You may need to adjust the idle setscrew based on
actual engine idle RPM. The engine idle speed should be 1050 RPM when warmed up.
Table 4: Idle Setscrew
Position Indication
|
Idle setscrew position |
Green LED |
Yellow LED |
|
|
On (not flashing) |
Off |
|
Higher than normal |
Flashing (4 times per
second) |
Off |
|
Lower than normal |
Off |
Flashing (4 times per
second) |
Directions for use
with DDFI, DDFI-2B, DDFI-2C, concluded
4. Resetting the TPS zero position
The tool can reset the TPS
zero position on all EFI-equipped Buell™ motorcycles. However, all Model Year
2008 and later EFI-equipped Buell™ motorcycles maintain the TPS zero position
automatically, so using the tool is usually not necessary.
For all EFI-equipped Buell™ motorcycles
prior to model year 2008, the adjustable idle screw must be backed out such
that the throttle plate fully closes in the throttle bore. This must be done
before using the following procedure. For model year 2008 and later, the idle
screw is factory adjusted and should not be changed.
- Begin with the ignition key OFF, run/stop switch
in RUN position, and throttle CLOSED.
- Turn the ignition key ON. All three LEDs will
blink once, and then the red LED will blink continuously. The green and
yellow LEDs will indicate the idle setscrew position (see 3. Checking and
adjusting the Idle Setscrew Position).
Note: The yellow light should blink
continuously, indicating that the throttle position
is too low (since the throttle plate has been fully closed at the start of this
procedure). It may indicate otherwise if the TPS zero position is off
significantly.
- After at least one second, hold the throttle
fully OPEN for one second. The green LED will blink once. The red LED will
continue blinking.
- Release the throttle and allow it to fully CLOSE.
The yellow LED will blink once. The red LED will continue blinking.
- After at least one second, hold the throttle
fully OPEN for one second. The green LED will blink once. The red LED will
continue blinking.
- Release the throttle and allow it to fully CLOSE.
The yellow LED will blink twice. The red LED will continue blinking.
- After at least one second, hold the throttle
fully OPEN for one second. The green LED will blink once. The red LED will
continue blinking.
- Release the throttle and allow it to fully CLOSE.
The red LED will turn on continuously, and the yellow LED will blink three
times. Then, the green LED will turn on for three seconds, indicating that
the zero position has been set (see *NOTE below). Then, the red and yellow
LEDs will flash continuously.
- Turn in the throttle setscrew until the green LED
turns on, indicating a factory default idle position.
- Turn off the ignition. All LEDs will turn off.
*NOTE: If the yellow LED
turns on and stays on during step h, turn the ignition key OFF, fully CLOSE the
throttle plates, and retry the procedure. This can happen if:
-
The engine is
cranked or started
-
Communication
problems prevent the TPS from being reset
-
The throttle is
not fully closed in step h
Directions for use
with DDFI-3
Table 5: Diagnostic connector
location, motorcycles with DDFI-3
|
Motorcycle |
Model Year |
Diagnostic connector location |
|
Buell™ XB9R and XB12R |
2008-2010 |
Left stalk of the fairing
support bracket |
|
Buell™ XB9S, XB9Sx, XB12S,
XB12Scg, and XB12SS |
2008-2010 |
Under the seat |
|
Buell XB12X, XB12X, XB12XP |
2008-2010 |
Left side of the tail
section near the rider’s leg |
|
Buell™ 1125R and 1125CR |
2008-2010 |
Below left air scoop |
Plug the tool into the 4-pin
diagnostic connector on the motorcycle.
1. Reading historic trouble codes
The tool causes the ECM to
“flash out” trouble codes on the Check Engine Lamp on the instrument cluster.
This function works on all motorcycles listed except for the Buell™ 1125, which
provides trouble code information through the text display on the instrument
cluster.
- Begin with the ignition key OFF, run/stop switch
in RUN position, and throttle CLOSED.
- Turn the ignition key ON. All three LEDs will
blink once, and then the red LED will blink continuously.
- After at least one second, hold the throttle OPEN
for one second. The green LED will blink once. The red LED will continue
blinking.
- Release the throttle and allow it to fully close.
The yellow LED will blink once. The red LED will continue blinking.
- Turn the ignition key OFF. All LEDs will turn
off.
- Turn the ignition key ON. All three LEDs blink
once, then the green and red LEDs turn on and stay on.
- Read the trouble codes by watching the Check
Engine Lamp on the instrument cluster. For a description of how to read
the “flash out” sequence and a list of codes see Appendix A.
- When done reading codes, turn the ignition key
OFF. All LEDs will turn off.
2. Clearing historic trouble codes and resetting the
Learned Fuel (Adaptive Fuel) Values
The tool can clear historic
trouble codes on all EFI-equipped Buell™ motorcycles. It can also set the
Learned Fuel Values to factory default.
NOTE 1: If your vehicle is located at high altitudes (e.g.
4000’ or more), resetting the Learned Fuel values to factory default will cause
the engine to operate with a rich air/fuel mixture until the ECM self-corrects.
NOTE 2: The historic trouble codes will be cleared
prior to resetting the Learned Fuel Values. Please make note of any historic
trouble codes prior to resetting the Learned Fuel Values.
- Begin with the ignition key OFF, run/stop switch
in RUN position, and throttle held OPEN.
- Turn the ignition key ON. All
three LEDs will blink once, and then the red LED will blink continuously.
- Continue to hold the throttle fully OPEN. The
yellow LED will blink 4 times, then the green LED will turn on and stay on
for one second (see *NOTE below). This indicates that the codes have been
cleared. If you DO NOT want to reset the Learned Fuel Values to factory
default, CLOSE the throttle at this point and go to step “e.”
- If you want to reset the Learned Fuel Values to
factory default, continue to hold the throttle fully OPEN. The yellow LED
will again blink 4 times, then the green LED and the red LED will turn on
and stay on (see *NOTE below). This indicates that the Learned Fuel Values
have been set to factory default.
- Turn the ignition key OFF. All LEDs will turn
off.
*NOTE: If the yellow LED turns
on and stays on in steps “c” or “d”, turn the ignition key OFF and retry the
procedure. This can happen if:
-
The engine is
cranked or started
-
Communication
problems prevent the trouble codes from being cleared or the Learned Fuel
Values from being reset to factory default.
Appendix A: Reading Trouble Codes with the Check
Engine Lamp
When CMI Lite commands the
ECM to “flash out” historic trouble codes at key on, the Check Engine Lamp will
use the following sequence:
-
4 seconds on
-
Intermission (6
rapid blinks, 3 per second)
-
Historic code
flash out consisting of:
o
2 second pause
o
1 second blinks
for first digit of trouble code
o
2 second pause
o
1 second blinks
for second digit of trouble code
o
2 second pause
-
Intermission
-
Next historic
code flash out
This pattern repeats until
all historic codes have been flashed out. The list of codes then repeats until
the ignition switch is turned off.
Note: If no historic codes
are logged, the intermission will repeat after a 2 second pause.
Table 7: Trouble Code
Reference
|
Trouble Code |
Name |
Condition |
Typical Causes |
|
11 |
TPS |
Throttle Position Sensor out of range |
Throttle position sensor electrical
issue |
|
13 |
O22 |
Rear Oxygen sensor stays rich, stays
lean, or is inactive |
Rear oxygen sensor electrical issue |
|
14 |
ET |
Engine Temperature input out of range |
Engine temperature sensor electrical
issue |
|
15 |
AT |
Air Temperature input out of range |
Air temperature sensor electrical
issue |
|
16 |
Bat |
|
Low battery or charging system problem |
|
17 |
O21 |
Front Oxygen sensor stays rich, stays
lean, or is inactive |
Oxygen sensor electrical issue |
|
18 |
LFCD |
Learned Fuel Cylinder Difference too
large |
Cylinder wear, fuel injector, or
oxygen sensor issues |
|
21 |
AMC |
Active Muffler Control output or
feedback issue |
Active muffler actuator electrical
issue |
|
22 |
AIC |
Active Intake Control fault |
Active intake actuator electrical
issue |
|
23 |
Inj1 |
Front fuel injector fault |
Front fuel injector electrical issue |
|
24 |
Coil1 |
Front ignition coil fault |
Front ignition coil electrical issue |
|
25 |
Coil2 |
Rear ignition coil fault |
Rear ignition coil electrical issue |
|
26 |
Clch |
Clutch input fault |
Clutch switch electrical issue |
|
27 |
Neu |
Neutral input fault |
Neutral switch electrical issue |
|
32 |
Inj2 |
Rear fuel injector fault |
Rear fuel injector electrical issue |
|
33 |
FP |
Fuel Pump fault |
Fuel pump electrical issue |
|
34 |
IAC |
Idle Air Control fault |
Idle air control motor failure |
|
35 |
Tach |
Tachometer output fault |
Tachometer output electrical issue |
|
36 |
CF |
Cooling Fan fault |
Cooling fan motor electrical issue |
|
37 |
VSP |
Speedometer output fault |
Speedometer output electrical issue |
|
43 |
VSI |
Vehicle Speed Input fault |
Vehicle speed input electrical issue |
|
44 |
BAS |
Bank Angle Sensor out of range |
Bank Angle Sensor electrical issue |
|
45 |
SI |
Sidestand input out of range |
Sidestand switch electrical issue |
|
46 |
SR |
Starter Relay output fault |
Starter relay electrical issue |
|
47 |
APR |
Auxiliary Power Relay fault |
Auxiliary power relay electrical
issue |
|
48 |
FPS |
Fuel Pressure Sensor out of range |
Fuel pressure sensor electrical issue |
|
52 |
RAM |
Random Access Memory fault |
ECU hardware problem |
|
53 |
ROM |
Read Only Memory fault |
ECU flash memory checksum problem |
|
54 |
EEP |
Electrically Erasable Programmable
Read Only Memory fault |
ECU EEPROM checksum problem |
|
55 |
ADC |
Analog to Digital Converter fault |
ECU hardware problem |
|
56 |
Sync |
Engine position sensor
synchronization error |
Engine position sensor electrical
issue, sensor mounting problem, or electromagnetic interference |
|
57 |
FPC |
Unable to maintain Fuel Pressure
Control |
Out of fuel, fuel pump failure, or
fuel pressure sensor failure |